

Artsy Journaling on a Dime:

I’ll have to confess that when it comes to journaling and planner-creating, I’m a bit of a shopaholic snob. I love looking for bright shiny stickers, multipage sticker books, washis, and pretty journals filled with lots of different type pages with fun sayings. I’ve quite literally spent hundreds of dollars on those things. But did you know with a little imagination you can get by with very little supplies? As I do some future projects on this site, you will see some pages I spent $$$ on and some will be done with some common things found around the house. As the above picture I created for my Grandy Dee’s Facebook page shows, it doesn’t take much to make a pretty picture to use in your planner.
Some inexpensive or free supplies to get you started could be:
*A notebook of some sort and size *Paper (blank, lined or graph will be fine) *Pencils/colored pencils *Watercolors/brushes *Paste/glue *Pens/markers *Old Greeting cards (cut out images can be used instead of stickers) *Ribbons/lace (can be used in the place of washis) *Wallpaper or paint samples from the hardware store can be used as backgrounds or cut into shapes or strips and used as washis. If you can’t get wallpaper, scrapbooking background sheets are relatively inexpensive, especially when they are on sale. *Scissors/Exacto-knife *Access to a computer and printer *Inexpensive calendar (if you’re making a calendar planner) *A box to store everything in (an old shoebox will work)
If anyone reading this post knows of any other “cheap stuff” to use, let me know in the comments below. I’m sure I left out something but this list will get you started. As I do my future page posts, a list of supplies will be included for each project.


The Blank Page

As I introduce my creative page, I want to suggest that we look at our own lives as a blank page or canvas. What are we going to do with it?
God said we are created in his image (Genesis 1:27). As a creation of God, he has given us the creative edge over all of his other species. While other animals respond instinctively to their surroundings, we have been given the ability to think and use our intellect. We interact in a different way to our environment. I love this!
There is something in us that feels the need to respond to what we see. We want to reproduce and reflect the beauty of this world. However, God has given each person a different skill set. Some are more talented in creating music, art, or writing. While others can’t do any of those things, or at least think they can’t.
Those who feel they are limited in the finer art skills, find ways to express their creativity by helping others, or discovering better ways of doing things. This is simply a different path of creation.
We are all a blank page waiting for the Master Creator to make us a beautiful work of art. How ready and willing are we in allowing Him to fill our page full of beautiful things?
As you begin your own journals and planners, consider this: There is no right or wrong way to begin. Just as God uses all shapes, sizes, colors, and different instruments in creating His work in us, we can also create beauty from anything in our environment. Look around you in your own world. Some have even repurposed common everyday junk! As you explore, you’ll be surprised at what you can find! Think on this; even in our low estate, God repurposed us into something fit for the Kingdom of Heaven!
“So God created man in his own image, in the image of God created he him; male and female created he them.” Genesis 1:27
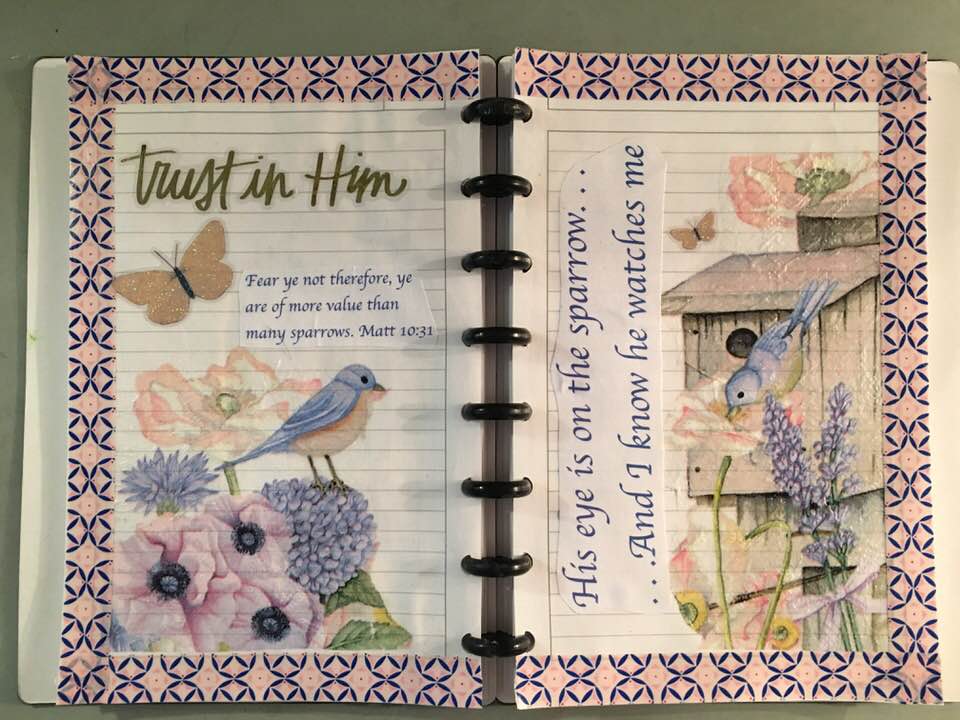
His eye is on the sparrow – Project #1
So it begins:
1. Get a good journal as your base. One with detachable pages are the best because you can separate the pages and lay them flat on a protected surface. That’s especially important if you are using a liquid medium like gesso or paint. Many office supply stores or hobby stores have these journals (I got this one at Staples). You can guess why this one appealed to me. Saw the butterflies–had to have it! The sticker ‘Collect Moments not Things’ was added to give my journal a title.
**Artsy on a dime: You can also use a spiral bound journal, just make sure you put a protective layer under the sheet you’re working on if you’re working with liquids. Parchment paper or vinyl will work.

2. Gather your art elements for the page: For this page you need assorted stickers, a pretty napkin with birds and flowers, washi tape, clear gesso, glossy royal coat decoupage, a sponge ‘paint brush’, a verse and other words typed on a computer and a heat dryer.
**Artsy on a dime: Stickers are relatively inexpensive, but you can also find images on line and cut them out and paste them. The pretty napkin image could be replaced by images from greeting cards or advertisements you get in the mail (might as well make use of them, am I right?). Washis can be made from strips of colored paper or ribbons. A hair dryer can be used as the heat dryer if you don’t want to buy a hobby one. Gesso makes an excellent glue for all your elements on the page and is especially necessary if your working with napkins. If you’re not using napkins, you may get by with glue/paste.

3. Lay out all of your elements on the page to determine where you want everything. Make a note of it or take a quick picture of it.

4. If you are using napkins, separate the plies. You will use only the top layer/printed ply.
5. Once you are happy with the placement, remove the items and cover the entire sheets with a thin layer of gesso using the sponge brush.
6. Carefully lay the napkin pictures on the gessoed surface and working from the center of the picture to the edges, smooth and make sure all of the picture is adhered to the surface. Add more gesso if needed. Be very careful because the napkins are delicate and will tear easily.
7. While the gesso is still wet, attach any items that are not normally sticky on the back (like the words printed from the computer). Stickers and washis can be added after the gesso is dried.

* Note: When the gesso dries, the paper will look wrinkled but I actually like the effect. It makes the pages looked ‘aged’.
8: Add the stickers and the rest of the items to your pages. Last; frame the picture with a coordinating washi, if desired.
9. After everything is done, coat the entire pages with a decoupage clear coat to give it a nice glossy surface. This protects and seals your artwork and gives it a finished look. Make sure the pages are completely dry before closing the book, this is where having a good heat dryer comes in handy.
10. Enjoy your masterpiece! Explore other ways to do things and please share your artwork with me. If you have any pages you created, I will download your images and share them right here.
Here are a few more pages from my inspirational journal:
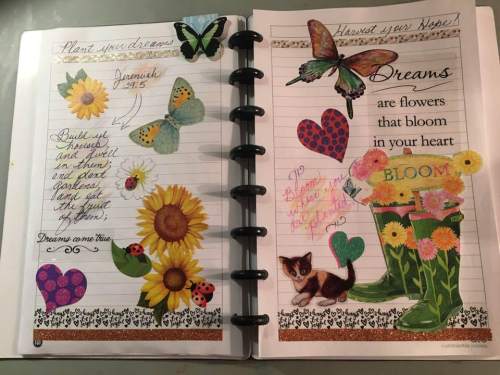
I did more hand writing on these pages and highlighted the words using gelato crayons and smearing them. The boot with the flowers was actually cut out of a greeting card and pasted on the page. The rest of the images were from stickers. When I do my pages I try to stick to a theme. Obviously the theme for these two pages was dreams/flowers and harvesting hope.

The background on the left side of the page and the upper right hand corner is taken from a sheet of scrapbooking paper. The tag is a die-cut tag that I embellished with stickers.

The flower images and the larger butterfly are cutouts from a paper napkin. You can find some pretty napkins on Amazon and on eBay. There are some websites that also sell individual napkins. I’ll post some links later after I get permission. Remember when using napkins, you need to coat the pages with gesso and while it is still wet lay the top only layer of the napkin down and smooth it with the sponge brush or your finger. After the gesso dries you can put on the stickers. then coat the whole thing with Royal decoupage coating. Add the 3-d stickers (in this case the cross and stars) and washi tapes last.

Again, I used a napkin image. The large butterfly was cut from scrapbooking paper and I used a metallic marker to write in (God’s Riches At Christ’s Expense). To make the two pages coordinated I used different parts of the same napkin on each side. The greenish butterfly, dragonfly, and 2 leaves at the bottom of the page on the right were all die-cuts from scrapbooking paper. They make fun little additions.

I love the way this one turned out. Again with the paper napkins, I also used some gold colored alphabet letter stickers to write God is Love.
Look for the good stuff Project #2
This project is going to be one that is done with less money involved. Going to walk you through it step by step.
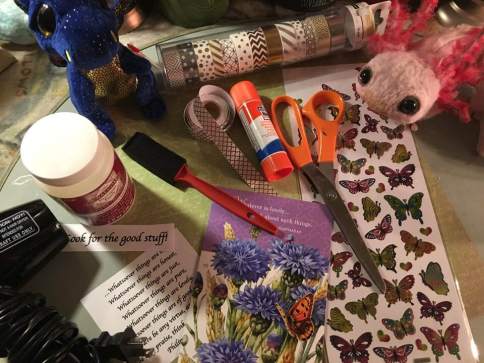
1. Collect your materials:
Sheet of scrapbooking paper, wallpaper sample or other colorful paper. * a greeting card or other picture * washi tape, ribbon, or paper cut in thin strips. * Verse or other sayings printed on your computer. * Scissors * glue (glue stick is the best)* Journal * Optional; stickers * Royal coat decoupage glaze * brush * dryer. (axolotl and dragon not included, LOL)
2. Cut the background sheets to fit in your designated area. I cut these so I could have room to write at the top and left an area on each side so I could frame it with washis. Don’t worry if it’s not cut evenly, you can fix the edges with the washi or ribbon. Glue paper on pages.

3. Apply the washi tape or ribbons or strips to the edges of the paper. *Note: an easy way to trim washis is by using the edge of a credit (or other plastic stiff) card and tearing the tape.

4. Cut out your quotes and pictures and determine where you want to place them in your layout. Note where you want them placed.

5. Glue quotes in place and border them with washi tape. I chose to use the same tape for the frames and borders, but you can do two different coordinating styles if you wish.

6. Glue your images in your designated area. If your images have a lot of jagged edges like mine, it is important to make sure that your glue/paste covers the entire back so the edges don’t curl up. Add additional stickers to areas that may need a ‘filler’ image. If desired, you can add more thoughts to your page.
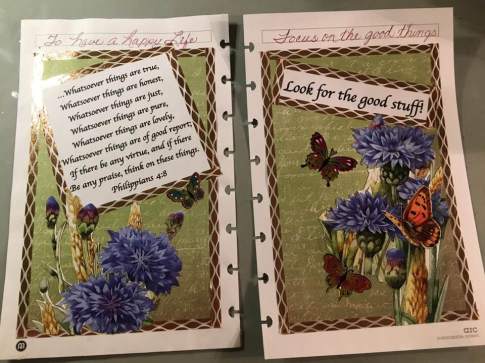
7. You can leave your page like that if you wish, but I prefer to decoupage the whole page with a decoupage clear coating to give it a finished look. It will also preserve your page and help the images adhere better. It gives it a satin or glossy finish.

Voila, and I didn’t break the bank for these two pages! Until next time!


Your journal page is so pretty and i am anxious to watch these
hoping maybe some of your talent will rub off on me!
LikeLiked by 1 person
Thank you Mary! I hope I can continue to inspire you and others. I need to stay on my toes with this too. I’ve done several spreads already, but I’m just now starting to create a step by step instruction guide for each post. I want to do some pages where it is all done with the inexpensive stuff too.
LikeLike
So pretty. I have been doing a big scrapbook, notebook journal this summer and it is big fat and messy at this point, next to yours I would be embarrassed to show anyone, but it has been so much fun. Just a lovely post. Thank you.
LikeLiked by 1 person
I’m kind of a beginner myself. So many people are much better than me. I’m kind of an artsy person and I don’t do this enough to keep me happy because I have so many other things going on, but hopefully I can create more soon. Keep working at it. I’d like to see something you’ve done!
LikeLiked by 1 person